
Dreamer Pro
Tags
Product Description
Dreamer Pro is an editor built for VRchat that allows you to make time-based scene manipulation projects or Dreams
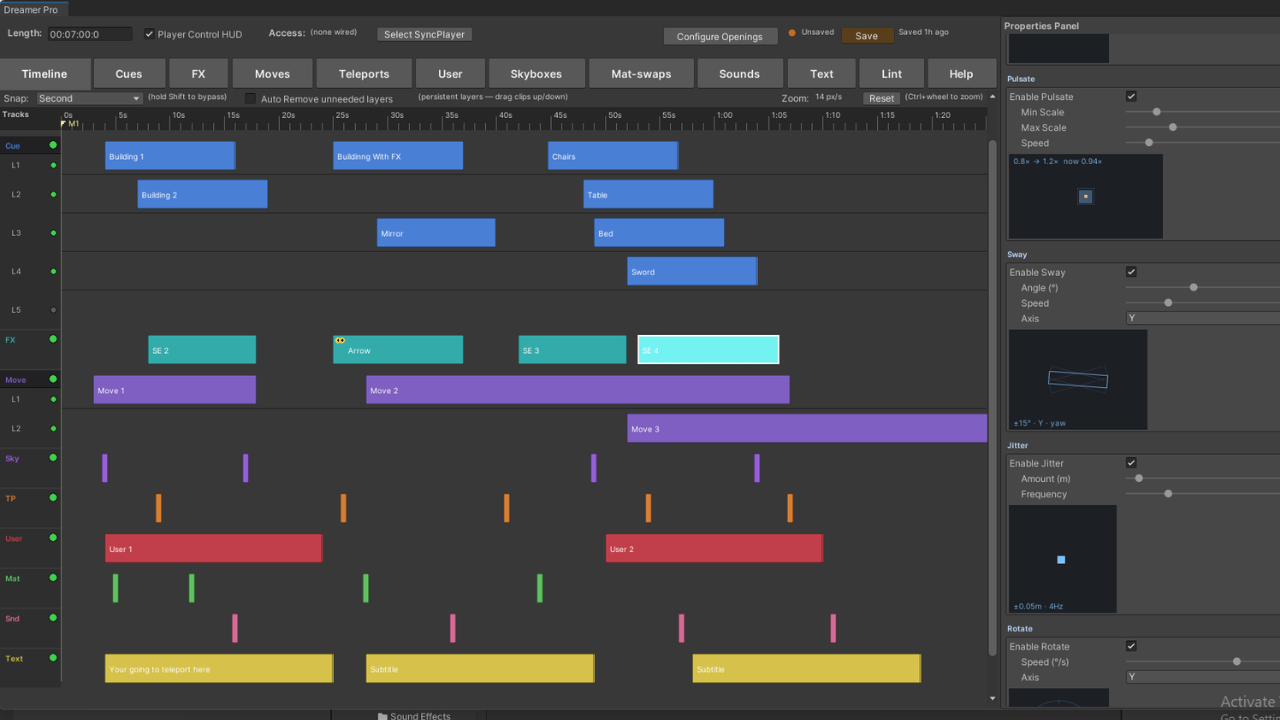
The dream editor: where you make the magic happen, dream editor takes inspiration from Premiere Pro, FL Studio and Davinci Resolve. If you’ve used any of those, dream editor will feel second nature with the timeline ruler, tracks and lane setup to build your dream
 Properties Panel: This is where you’ll see practically all configuration options when you click on something in the dream editor.
The nodes on the timeline explained in order;
Cue: this node is how you control when objects are or aren’t in a scene, when you add a cue node and slot in an object that object automatically becomes apart of the dream sequence and will only appear in the scene during the duration/length of the node. Cues also have a transition tab in the properties panel, here you can control how you want an object to enter or exit the scene and how quickly it happens, here you can chooses from five procedural Ingress/digress animations
- Scale in/out
- Shake in/out
- Fly in/out
- Bounce in/out
- Spin in/out
FX: in many ways is a sister node to cue, its focus what’s happening to an object while it’s in the scene, slot an object into an FX node and you have the option to give it an effect, for when you don’t want it to be static while it’s in the scene you can make it
- Hover
- Pulsate
- Jitter
- Rotate
- Orbit
FX nodes can be placed anywhere but it makes sense to place them while an object is in the scene under a cue node. For extra convenience if your goal is to have an object be FX effected throughout the entire duration of that objects cue you can marquee select both of them and link them as long as they both have the same objects slotted in, this auto sizes the FX node to the duration of the Cue node it’s linked to and also makes the transition from FX to Cue transition out much smoother along with the Cue transition in to the initial FX start
Move: the third and last of the nodes that effects an objects position is a move node, when you have a move node on the timeline you can configure it in properties panel to move an object to a particular area at runtime, you have the option to do this smoothly so that the object eases to its new position or just appears at it
Skybox: this node allows you to change the skybox of the world, and gives you the option to have it spin in or cut into the scene with caveats depending on what kind of skybox it is
TP: this node allows you to teleport a person at any point in in the dream, you can configure the node to teleport people in a certain formation if there are multiple people expected to be experiencing the dream and you have the options to exclude certain people by player name
User: this node allows you to lock players in place at a certain time, block jumping or increase there speed/ Jumping
MatSwap: this node allows you to swap the material of any object on the scene and also allows you to have multiple MatSwaps at the same time for different objects
Text: add text to the scene that follow the player and appear for a certain amount of time, you have options to change the color or add a background to the text
Prompts: Prompts are the start to conditional nodes, bring in a prompt node and configure it with a question and answers from there, when you right click on any node (besides a prompt node) you can make it conditional and set the conditions to any prompt and answer that takes place before said conditional node
Requirements:
Video TXL 1.8.1 or Up
Common TXL 2.4.15 or Up
Install Instructions:
Recommended install: local VPM package through VRChat Creator Companion.
1. Open VRChat Creator Companion.
2. Add the TXL VPM repository:
3. Add TXL - VideoTXL to your world project.
CommonTXL is installed automatically as a dependency.
4. Extract Dreamer-Pro.zip somewhere you keep local packages.
5. In VCC, open Settings > Packages.
6. Under User Packages, add this folder:
Dreamer-Pro/com.realm.dreamer
7. Return to Manage Project and add Dreamer Pro.
8. Open Unity.
9. If Unity prompts for TextMesh Pro Essentials, import them.
10. In Unity's top menu, choose:
Dreamer Pro > Add "Sync Video Player (With Dreamer Pro)" Prefab to Scene
Notes:
- Dreamer Pro ships two ways: the zip (VCC local package, steps above) and a .unitypackage with the same files.
- The .unitypackage route: make sure VideoTXL is in the project first (steps 1-3), then import the Dreamer Pro .unitypackage. It installs into the project's Packages folder.
Terms of service:
What you can do
- Use Dreamer Pro to build and publish your own VRChat worlds and experiences, for personal or commercial projects.
- Keep working copies and backups for your own use.
What you can't do
- Don't redistribute, share, resell, sublicense, rent, or give away the package, its files, source code, prefabs, or any repackaged or derived archive of it.
- Don't strip or alter this license or the ownership notices.